In today’s digital age, encountering ads has become an inevitable part of our online experience. While advertising serves as a vital revenue stream for content creators and app developers, it can often be intrusive and disrupt the user’s browsing or app interaction. Fortunately, Android users have several effective methods at their disposal to block ads and reclaim a smoother, more streamlined experience.
This guide will explore various techniques to help you successfully block ads on your Android device. Whether you seek to improve browsing speed, reduce data usage, or simply gain greater control over your app environment, implementing these methods will empower you to take charge of your ad-free Android journey.
By Using a Private DNS (Android 9 or Later)
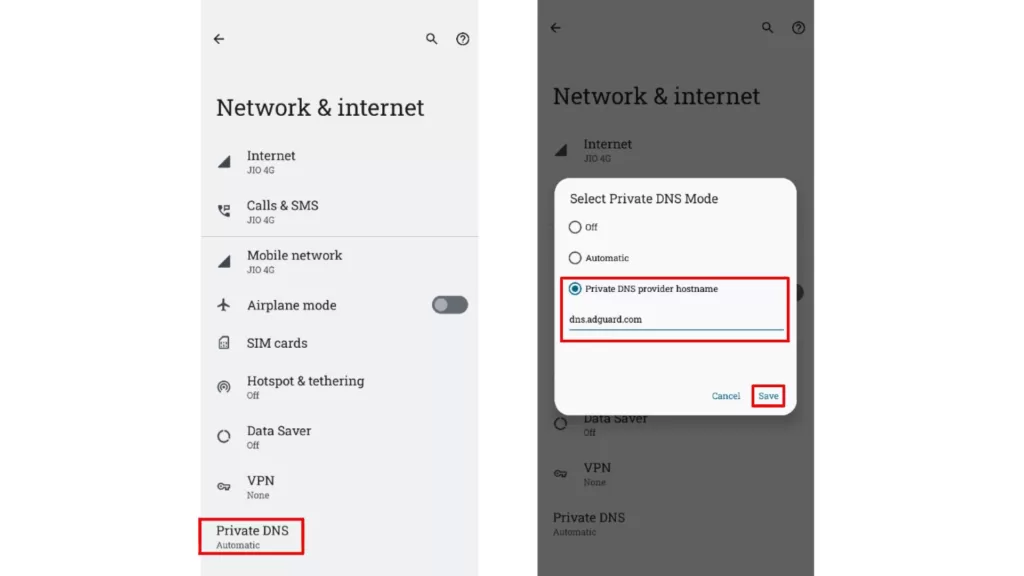
If your Android device is running Android 9 (Pie) or a later version, you can set up a Private DNS to block ads without needing third-party apps.
- Go to Settings > Network & Internet > Private DNS. Choose the option that says Private DNS provider hostname.
- Now, all you need to do is enter the DNS address of a trusted ad-blocking server. There are plenty of them out there, and you can find some popular ones like dns.adguard.com or others. You can use family.adguard-dns.com to block adult content.
- Save the settings, and your device will start using the specified Private DNS, which will block ads on a system-wide level.

By Using a Third Party Ad Blocker App
Install a reputable ad blocker app from the Google Play Store. Some popular options include AdGuard, Blokada or DNS66. Ensure you choose a well-reviewed and trusted app. Once installed, open the app, and follow the on-screen instructions to set it up. Usually, these apps create a VPN to filter and block ads system-wide.
Apps like Adguard, Blokada and DNS66 do not require root access to block ads. However, some other applications may require root access. Choose a no-root method for the safety of your device.
Some ad blocker apps even offer customizable settings, allowing you to fine-tune your ad-blocking preferences. You can even whitelist your favorite websites to support content creators you love.
By Using an Ad Blocking Browser
You can use a web browser that includes built-in ad blocking features. Examples include Brave Browser, Mozilla Firefox, Samsung Internet Browser, or Kiwi Browser with its ad-blocking capabilities. Firefox has extensions such as Adblock Plus or uBlock origin which block the ads while browsing.
Blocking Ads on Google Chrome
Unfortunately, Google Chrome for Android does not support extensions like its desktop counterpart. As a result, you won’t be able to use traditional ad blocker extensions directly within the Chrome app on your Android device. However, it comes with a built-in pop-ups and redirects blocker and ad blocker to block ads which are intrusive and misleading.

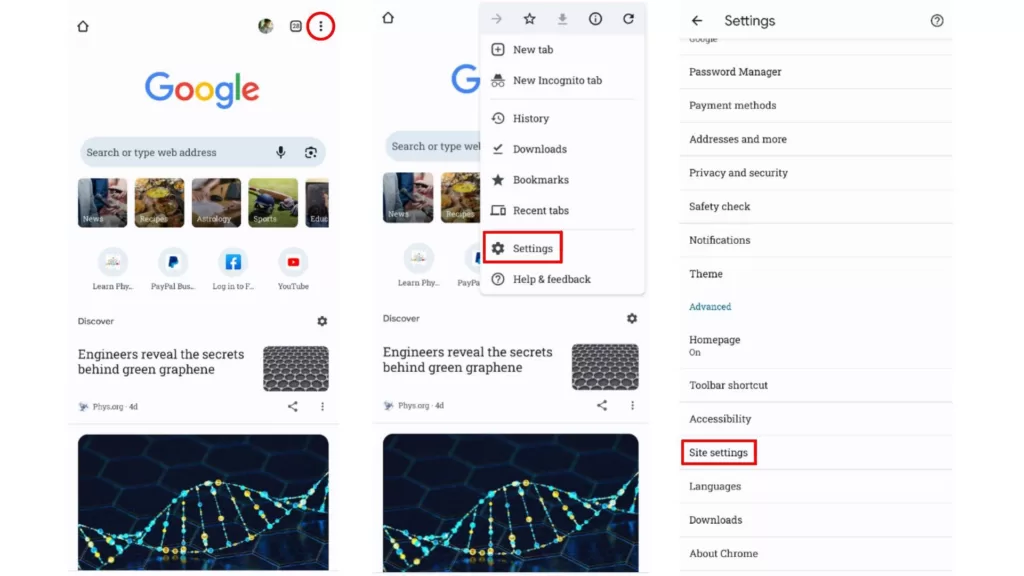
- Open Google Chrome.
- Tap the three dot menu in the top right corner.
- Go to Settings > Site Settings under Advanced.
- Scroll down and open Pop-ups and redirects and enable it.
- Go back to Site Settings > Intrusive ads and enable it.

Also check the site notifications regularly. Site notifications in Google Chrome are small pop-up messages that some websites may send to your device, even when you’re not actively using the browser. These notifications can be useful for receiving updates from your favorite websites, but they can also become annoying if too many websites request permission to show notifications.
Luckily, you have the option to manage and control site notifications in Chrome settings on your Android device. To do this, open Google Chrome and go to Settings > Notifications and disable the toggle from the websites from which you do not want to get notifications. By managing site notifications in Chrome settings, you can choose which websites can send you notifications and prevent unwanted pop-ups from interrupting your browsing experience.
Blocking Ads on Home Screen
If you are experiencing ads on your Android home screen, then you might have unknowingly installed a malicious app that displays ads on your home screen. Some apps from third-party sources or untrusted developers may contain adware that serves ads even when you’re not using the app.
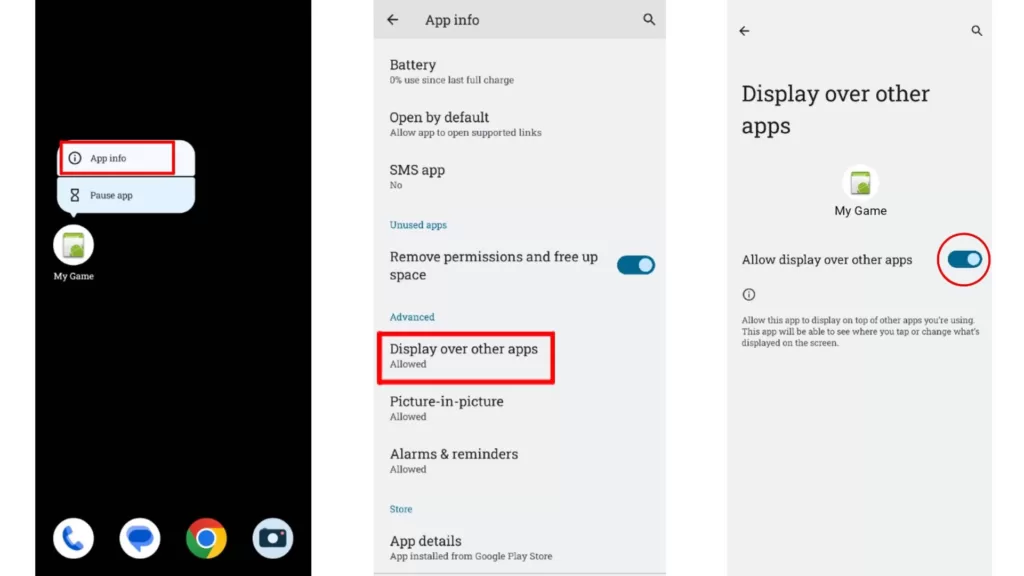
To block ads on your home screen, first identify the app which is serving the unwanted ads. This can be done by looking for the app name when it sends the notification or by looking for unrecognised app in the list of installed apps on your device. Uninstall any apps you don’t recognize or suspect to be the source of the ads. But if you want to keep the app, then you have to disable the permission to display over other apps. To do this, long tap the app icon and select App info. This will open the App info menu. Scroll down to Display over other apps and turn it off.

If you have installed any third-party launcher app (app that modify your home screen appearance), then it may also cause ads to show up on your home screen. You can simply uninstall such launcher apps to stop the ads. Some wallpaper services also show news and other recommendations on your home screen, you can disable such services if you do not want them.
By Rooting Your Device (Not Recommended)
Rooting your Android device gives you deep access to system files and settings, allowing you to use powerful ad-blocking apps that require root access. Be cautious when rooting, as it can void your warranty and potentially cause issues if not done correctly.
Some apps like AdAway use the host file modification method to block ads. These are specifically designed for rooted devices, as they require access to the system files to make changes to the host file. AdAway works by modifying the host file on your Android device. The host file is a plain text file that maps domain names to IP addresses. By adding entries to this file, AdAway blocks access to known ad servers, preventing ads from being displayed.
It’s important to note that while AdAway is a potent ad-blocking solution, it does require technical knowledge and familiarity with rooting procedures. Additionally, modifying system files has its risks and may cause issues if not done correctly. Always make sure to create a backup of your device and understand the implications before proceeding with rooting and using AdAway.
By Manually Modifying Hosts File (Not Recommended)
Rooting your device allows you to modify hosts file. Blocking ads by modifying the hosts file is an effective method that doesn’t require installing third-party apps. The hosts file is a text file on your device that maps hostnames (like website URLs) to IP addresses. By adding entries to this file, you can redirect ad-serving domains to a non-existent IP address, effectively blocking ad servers.
Please note that modifying the hosts file requires some technical knowledge, and it’s essential to be cautious not to interfere with critical system functions. Additionally, the process might differ slightly depending on your Android version and device model.
Before modifying any system files, it’s essential to create a backup of your device or, at the very least, the hosts file. This precaution ensures you can revert any changes if something goes wrong.
- Prerequisites: A file manager that allows to browse and edit system files is needed. Solid Explorer, MiXplorer and ES File Explorer are popular choices. You’ll also need a text editor app to edit the hosts file. Many file manager apps have built-in text editors, or you can use separate apps like QuickEdit Text Editor.
- Launch your file manager app and navigate to the root directory. Usually, it’s located at /system/etc/hosts. Our goal is to edit /system/etc/hosts to direct the ad sites to 127.0.0.1.
- Make a copy of the hosts file and store it in a safe location as a backup.
- Open the hosts file with a text editor. If your file manager app doesn’t have a built-in text editor, it might prompt you to choose an external text editor app.
- Add entries to block ad-serving domains. The typical format is: <IP Address> <Ad Domain>. For example, to block ads.example.com, you can add:
127.0.0.1 ads.example.comYou can find lists of ad-serving domains online or use specific ad-blocking hosts files. Then, save the modified hosts file in the text editor and reboot your Android device to apply the changes.
Keep in mind that the hosts file approach might not be as comprehensive as using dedicated ad-blocking apps or browser extensions, and it might not block all types of ads. Additionally, updating the hosts file manually can be time-consuming compared to automated updates offered by dedicated ad-blockers.
If you encounter any issues or want to revert the changes, use the backup you created earlier or remove the added entries from the hosts file.
If you’re uncomfortable with the risks and complexities associated with rooting your device, consider using one of the non-root ad-blocking methods mentioned earlier, such as using a third-party ad blocker app or an ad-blocking browser. These methods are safer and more user-friendly, providing effective ad-blocking without requiring root access.
Remember that while ad-blocking can be beneficial, it can also impact the revenue of content creators who rely on ads for support. Consider whitelisting specific websites you want to support or turning off ad-blocking on websites you trust.
Also, some apps and websites may detect ad-blockers and limit access or functionality. In such cases, you might need to disable ad-blocking temporarily for those apps or sites.
Please note that the steps or options available may vary slightly based on your Android version and device manufacturer. Always be cautious when installing third-party apps, and download them from trusted sources.


